As small-space living trends continue to thrive, renters often seek creative solutions for privacy without a permanent commitment. If you're in a studio apartment and craving a sense of privacy for your sleeping area, this renter-friendly DIY room divider serves as a stylish and functional option. It won't take up precious floor space, and it encourages a cozy, inviting atmosphere while allowing natural light to flow through.
The Concept of the Divider
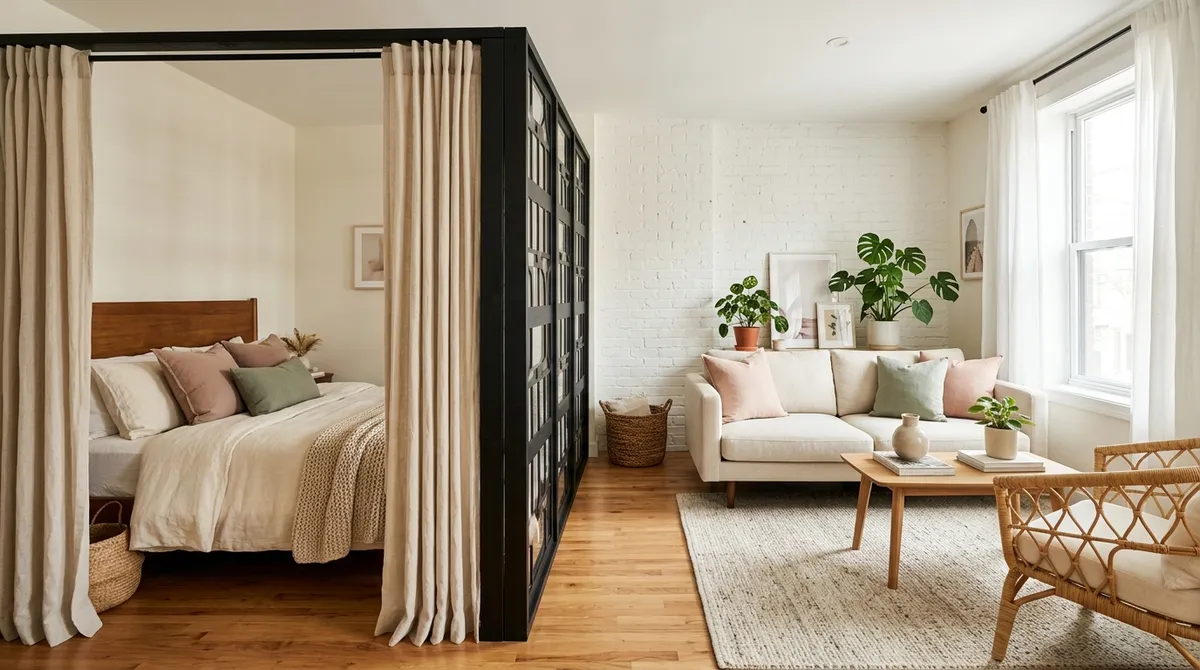
This DIY project focuses on creating a room divider that resembles an industrial glass setup using painted wood, transparent cut-outs, and a curtain for flexibility. The goal here is to maintain a chic look without the hefty price tag of traditional glass partitions. With this clever approach, you can carve out a beautiful nook to retreat to at the end of the day without feeling confined.
Materials You’ll Need
To successfully create your own room divider, gather the following materials:
- Painted wooden boards (choose a color that complements your decor)
- Transparent acrylic or plexiglass sheets (for cut-outs)
- Curtain rod and lightweight fabric curtains (for flexible privacy)
- Screws, brackets, and tools for assembly
Step-by-Step Instructions
1. Plan Your Layout
Start by assessing the space where you'd like to place the divider. You want the sleeping nook to feel separate yet open. Measure the area to ensure your divider fits perfectly without obstructing light or flow.
2. Cut and Paint Your Wooden Boards
Cut the wooden boards into your desired heights and widths for the frame. Once cut, paint or stain them according to your preferred aesthetic — matte blacks or whites work great for that industrial look.
3. Create Transparent Cut-Outs
Using the acrylic sheets, design transparent cut-outs into the wood frame. This will enhance the airy feel of your space while still providing a degree of separation. You can create geometric shapes or decide on a more abstract design — let your creativity shine!
4. Assemble the Room Divider
With the frame painted and cut-outs ready, assemble your divider using screws and brackets. It’s helpful to have an extra pair of hands during this step to ensure everything aligns perfectly. Secure it against a wall if possible for added stability.
5. Hang the Curtains
Install a curtain rod above your newly created divider. Choose lightweight fabric curtains that match or complement your color scheme. This will allow you to pull them aside when you want an open concept or draw them closed for complete privacy.
Tips for Enhancing Your Nook
- Lighting: Add string lights or a small lamp to the nook area to create a warm, inviting glow during evenings.
- Decor: Incorporate cushions, throws, or a small side table to enhance comfort and functionality in your nook.
- Plants: A few carefully placed plants can add life and vibrancy to your space, making it feel more welcoming.
Final Thoughts
This DIY room divider not only gives you a cozy sleeping nook in your studio but also allows you the versatility needed for small spaces. By using wood and acrylic, you can achieve that sought-after industrial look without compromising on light or style. Create your retreat today and enjoy the perfect blend of privacy and openness in your home! Remember, the best part is that you can easily modify the design to suit your style and needs, making this project truly yours.